I've wanted to make an Advent calendar for a couple of years now and finally got around to it over Thanksgiving break this year.
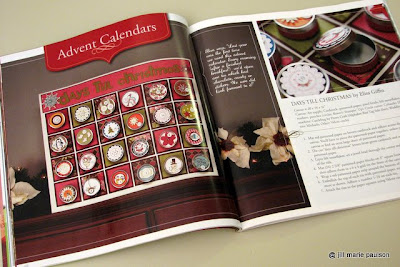
I had mentioned in my review post for Scrapbook Trends Holidays idea book, there was an Advent calendar included in that issue the really encouraged me to get it done in time for this year's holiday season.
Here's the spread that included my inspiration.
The canvas in my inspiration piece was unaltered, but I wanted to add something a little extra, so I decided to give it a crackle texture.
First, I painted it with a deep red that would coordinate well with the patterned papers that I would be using.
While that layer was drying, I started to work on the layered squares that would hold the 24 tins.
I cut a 2 3/4 inch square in a deep brown as the foundation for each tin.
Then, I cut a 2 5/8 inch square to layer over the top and punched a 2 inch circle from the same design of patterned paper. The circles would later be used to embellish the lid of my tins.
Each square has a different patterned paper - 24 patterns in total.
I also punched 24 2 1/2 inch scalloped circles. These were all a solid cardstock and I used three different colors - deep red, deep green and a lighter green.
Then, I loosely matched up all my sets.
Next, I rounded the corners on my 2 5/8 inch squares and inked the edges of all my layers - circles and squares alike.
Then it was time to adhere the 2 5/8 inch patterned squares to the 2 3/4 inch brown squares. I then adhered the 2 1/2 inch scalloped circle to the 2 5/8 inch square, choosing the solid color that coordinated best with each pattern.
By this time, my layer of red paint was dry on my canvas and it was time to add the crackle medium.
Ohhh...shiny...

Now, while that layer was drying, I started working on the actual embellishment of the 24 tins.
Again, each tin is embellished uniquely. No two are the same. The only thing that ties them together are the number stickers that I used by Making Memories to countdown from 24 to 1.
Again, each tin is embellished uniquely. No two are the same. The only thing that ties them together are the number stickers that I used by Making Memories to countdown from 24 to 1.
Once the crackle medium was dry, I added a layer of cream colored paint.
In this case, it was actually FUN to watch the paint dry and see the crackle finish appear!!
Once the last layer of paint was dry, it was time to adhere all the squares and tins. I attached the tins using velcro tabs so that they can be removed from the canvas.
I printed the title, embellished with rub ons and added to the canvas as the finishing touch!
All that was left was to add a piece of candy to each tin. Kaitlin's been enjoying this little treat each day as we count our way down to Christmas!!
The great thing is that no full sheets of patterned paper were harmed in the making of this project! :-) It was a great way for me to use up bits and pieces of holiday-themed scrapbook papers that I had left over from previous years.
I also got the canvas (14" x 18") at Hobby Lobby when it was on sale for 50% off and I used a 40% off coupon for the tins which I actually found in the wedding aisle and came in a box of 24 - how perfect!
So, overall, this was a pretty cheap project to complete considering it's size.
Here's a few more pictures of the finished product.
I'd love to know what you think!! Please leave me a comment...
Supplies:
Canvas: Master's Touch
Favor Tins: Hobby Lobby
Cardstock: Bazzill
Patterned Paper: My Mind's Eye, Making Memories, Basic Grey, SEI
Rub ons: Pink Paislee
Gems: My Mind's Eye, unknown
Buttons: Unknown
Metal Signs: Making Memories
Epoxy Stickers: Making Memories
Number Stickers: Making Memories
Brads: Prima, Making Memories
Flowers: Prima
Metal/Gem Snowflakes: Favorite Findings (Wal-Mart)
Circle Punches: Marvy
Corner Rounder: Marvy
Scallop Border Punch: Fiskars
Paint: Americana
Crackle Medium: Folk Art
Velcro: Velcro


